The Daring Baker: Armenian Nutmeg Cake

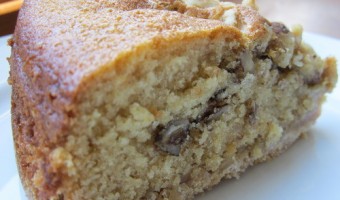
The Daring Bakers’ April 2012 challenge, hosted by Jason at Daily Candor, were two Armenian standards: nazook and nutmeg cake. Nazook is a layered yeasted dough pastry with a sweet filling, and nutmeg cake is a fragrant, nutty coffee-style cake.

Jason described the Armenain Nutmeg Cake as a twist on traditional coffee cake, although it might bring a nice respite to bakers longing for a break from yeasted dough pastries. I went with Jason’s easy method and made this in the food processor. This was a big step for me a I really hate the food processor. I mostly hate it because I always seem to have to clean it after Brian uses it but I also fear it will chop my fingers off. At any rate, I got over this fear and not only used but cleaned it with all of my fingers still in tact!

I was excited this recipe called for freshly ground nutmeg. Freshly ground nutmeg is another kitchen tip that Brian introduced me to over the years. It is so simple that I am amazed the ground stuff still sells! If you haven’t tried using freshly ground nutmeg, you really must give this a try!

Here is the final cake. I was worried it didn’t bake enough when I pulled it out and it didn’t. It was getting so brown though I went ahead and took it out. The bottom was done for sure so I am glad I didn’t leave it any longer.

And here is a slice …

Finally, here is Sophie (4 years old) enjoying a bite …

The nutmeg taste with the walnuts in this cake is amazing. I really love the crust on the bottom … now to figure out how to get the middle to cook all the way!

I love all things coffee cake (well minus the actual coffee, I know I am odd) so this was an easy love for me. I did like the food processor method and will have to think about this for some of my other baking efforts!

Have you ever tried an Armenian Nutmeg Cake? Leave a comment and let me know!


The Daring Cooks’ April 2012 Challenge – Create Your Own Recipe

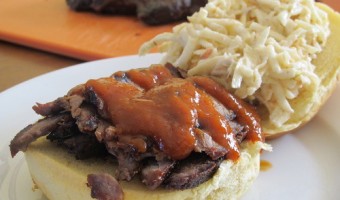
With our diet plan for January, February, and March, we haven’t had a great opportunity to do our Daring Kitchen Challenges this year.  We are very excited to get back in the mix and take up the challenge for the rest of the year.

Our April 2012 Daring Cooks hosts were David & Karen from Twenty-Fingered Cooking. They presented us with a very daring and unique challenge of forming our own recipes by using a set list of ingredients!

As part of the challenge, we were required to pick one ingredient each from three lists:

List 1: Parsnips, Eggplant (aubergine), Cauliflower
List 2: Balsamic Vinegar, Goat Cheese, Chipotle Peppers
List 3: Maple Syrup, Instant Coffee, Bananas

I chose to use parsnips, chipotle peppers, and instant coffee to create a Coffee Rubbed BBQ Sandwich with Chipotle BBQ Sauce and Apple Parsnip Slaw.

Coffee Rubbed Beef BBQ Sandwich with Chipotle BBQ Sauce and Apple Parsnip Slaw

The combination of sweet and spicy made this a sandwich that you would go back to over and over again.  So yummy!

Ingredients

2 Tbsp instant coffee
2 Tbsp kosher salt
2 Tbsp sweet paprika
2 Tbsp brown sugar
1 tsp black pepper
1 tsp garlic powder
1 tsp onion powder
2 eye of round steaks
Chipotle BBQ Sauce (recipe follows)
Apple Parsnip Slaw (recipe follows)
8 sandwich rolls

Directions

 Combine first 7 ingredients (through onion powder) and coat steaks liberally.  Place into a zip top bag and refrigerate 8 hours or overnight.  Pull steaks out about 30 minutes before cooking to allow them to come to room temperature.

Heat one side of a grill on medium-high heat and the other on low heat.  Sear steaks over medium-high heat about 5 minutes on each side.  Move to the low heat side and cook for another 30-45 minutes or until meat is cooked through and indents when you push it.

During the last 10 minutes of cooking, baste the meat with the Chipotle BBQ Sauce, flipping and basting at least 3 times per side.  Allow to rest 10 minutes before slicing thinly.

To serve, place a small pile of meat on a sandwich bun and top with sauce and Apple Parsnip Slaw.  Enjoy!

Chipotle BBQ Sauce

You can add more or less of the chipotle or adobo depending upon how spicy you like your sauce.

Ingredients

1 Tbsp olive oil
1/2 medium onion, chopped
2 cloves garlic, minced
1/2 tsp salt
1/2 tsp pepper
2 chipotle peppers, chopped
1 Tbsp adobo sauce
1 cup ketchup
1/4 cup brown sugar

Directions

Heat oil in a saucepan over medium-high heat.  Add onion and sautee 3-4 minutes.  Add garlic, salt, pepper, and chipotles and sautee another 3-4 minutes.  Add remaining ingredients, turn heat down to low, and cook for 10 minutes.  Pour into a blender and puree sauce.  Return to heat and keep warm until ready to use.


Apple Parsnip Slaw

My tip:  Mix all of the dressing ingredients together before shredding the apple so that they don’t turn brown!

Ingredients

1/2 cup buttermilk
1/4 cup plain Greek yogurt
1/4 cup mayonnaise
1/2 tsp sugar
salt and pepper to taste
2 tart apples (Fuji, Granny Smith, etc), shredded
3 medium parsnips, shredded

Directions

Combine first five ingredients.  Mix well.  Combine apples and parsnips and coat well with the dressing mixture.  Refrigerate or allow to sit at room temperature for 15-20 minutes to allow flavors to develop.


Have you ever created a recipe?  Given those lists of ingredients, what creations could put together?  Leave us a comment and let us know!

The Daring Baker: Quick Bread

The Daring Bakers’ February 2012 host was – Lis! Lisa stepped in last minute and challenged us to create a quick bread we could call our own. She supplied us with a base recipe and shared some recipes she loves from various websites and encouraged us to build upon them and create new flavor profiles.

I decided to go with a muffin version of a quick bread. Since I have been very limited on time, the decision was easy to just find a new recipe to try. The bananas on the kitchen table that needed used up made it an easy decision that it would be a banana recipe. I went with the Chocolate Chip Banana Muffin recipe at Allrecipes.com.

Quick breads are a favorite here at our house. The challenge we have is finding a new recipe we want to be daring enough to try as we already have so many favorites!

What is your favorite quick bread recipe? Leave me a comment and let me know!


The Daring Cooks Challenge: Char Sui Bao

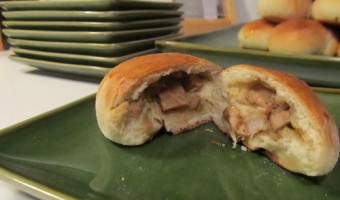
Our Daring Cooks’ December 2011 hostess is Sara from Belly Rumbles! Sara chose awesome Char Sui Bao as our challenge, where we made the buns, Char Sui, and filling from scratch – delicious!

Thanks so much Sara for a great challenge.  I’ve seen these sorts of things on some of the shows that I watch, but never really thought about how to go about making them.  Basically, char sui is a kind of pork barbecue.  Char sui bao is that same barbecue stuffed into a baked or steamed bun.  Since I don’t have a steamer basket, I wound up baking mine.

As I got to making these, I realized how really simple and flexible these could be.  The filling could be just about anything, really.  The char sui filling that we made for the challenge was supposed to have been made with pork tenderloin, but pork chops cost about half as much, so we went with that.  The filling turned out a little dry and chunky, but that’s more my fault than anything.  Next time, I think I will chop things up a little more, make the sauce for the filling a little thicker, and be sure that the dough for the buns is a little thinner.  Also, because these were a little dry for me, I think some sort of dipping sauce would be a nice touch.  Here are a couple of pictures of my little creations.

Have you ever tried char sui bao?  If not, I hope you take the opportunity.  Leave us some comments and let us know what you think.  If you need the recipe, just let us know and I’ll get it out to you.  Make sure you take a look at our other Daring Kitchen adventures!

The Daring Baker: Sans Rival

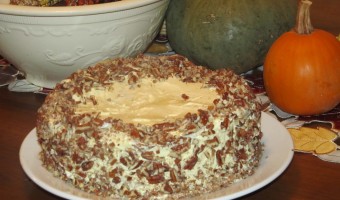
Catherine of Munchie Musings was our November Daring Bakers’ host and she challenged us to make a traditional Filipino dessert – the delicious Sans Rival cake! And for those of us who wanted to try an additional Filipino dessert, Catherine also gave us a bonus recipe for Bibingka which comes from her friend Jun of Jun-blog.

I decided to stick to the Sans Rival cake just due to the amount of time I had available. The semester is winding down for my graduate class and my time is pretty limited but baking is a great stress relief for me … well most of the time.

The Sans Rival cake is a sponge cake. It traditionally has cashews in it but it seems my mother only baked with pecans and that is all I bake with too. I had the pecans in the pantry and it is hard to turn down anything with them in it so I figured pecans was the way to go. Brian’s comment was the pecan flavor made the dessert more “Southern”. Maybe those years living near the pecan plantation in South Carolina did wear off on my mom and that is why she bakes so much with pecans! It doesn’t really matter though as the pecan version was amazing. Brian requested to keep the traditional recipe (no chocolate). I decided to add the vanilla to the french buttercream icing because I love vanilla flavoring. My first attempt at the icing was not a success but the second time it worked thanks to Brian!

The icing seemed a bit skimpy to me to cover the sides and top pretty but the pecans along the edges made a nice finishing touch for sure. I went along the upper edge to just continue the decoration a little like I have seen with some other “fancy” cakes.

I did have to bake the cake in two batches because I only had two 9″ cake pans. I think one of my layers wasn’t as full as the others because it broke coming out of the pan. The beauty of the icing is that you can’t tell!

The directions said to eat it within in three days and I know we won’t be able to down this in that time. So I think I will freeze some and take it my dad. He loves pecans so I am thinking he will really love this cake!

Have you ever tried a Sans Rival cake? Do you bake sponge cakes? Leave us a comment and let us know!

The Daring Cooks’ Challenge: Cooking with Tea

Sarah from Simply Cooked was our November Daring Cooks’ hostess and she challenged us to create something truly unique in both taste and technique! We learned how to cook using tea with recipes from Tea Cookbook by Tonia George and The New Tea Book by Sara Perry.

I have been interested in cooking with tea for some time.  Sarah offered up some options, including a couple of Asian dishes, but the challenge was simply to create a savory dish using tea.  Being Southern, I grew up with the belief that it only counts as tea if it is sticky sweet.  With that in mind and a need to practice my chops for the upcoming Thanksgiving cooking marathon, I decided to brine a chicken in sweet tea and to oven roast it.  The great part about this recipe is that most of the time spent preparing it is inactive.  You create the brine, but the chicken just sits in it for a while.  You pull it out of the brine and prepare it for roasting, but then it just roasts for a while.  It really couldn’t be easier to put great food on the table!

 Peekaboo!  That little chicken is so happy in there.  It’s almost a shame to take it out.

See how the skin soaks up that tea?  That’s how you know it’s going to be good!

All ready to go into the oven.  See you later, pal!

Golden brown and delicious!  Time for a little rest before slicing.

Sweet-Tea Brined Chicken

If you didn’t know that it was tea, you might wonder how this was prepared.  Once you know it’s tea, the tastes are clear and add to the experience.  If you are using this for a turkey, just triple the recipe and you should have plenty of brine for it!

Ingredients

2 quarts cold water
6 individual-sized tea bags
peel from 1 lemon
1 Tbsp dried rosemary or Italian seasoning
juice from 2  lemons
2/3 C kosher salt
1/2 cup brown sugar
2 quarts ice cubes
1 3-4 lb chicken (inside stuff removed)
2 Tbsp olive oil
salt and pepper to taste

Directions

Bring water to boil and add tea bags, lemon peel, and rosemary.  Allow to steep for 15-20 minutes and remove tea bags.  Add lemon juice, salt, and sugar and stir to dissolve.  Add ice cubes and stir until ice cubes are mostly melted and brine is cooled completely.  Pour the entire mixture into a vessel large enough to hold the liquid and the chicken.  Add the chicken and top with a heavy plate to keep it submerged in the brine.  Allow to sit for at least 12 hours and up to 2 days.

When ready to cook chicken, preheat oven to 425.  Remove chicken from brine and rinse thoroughly.  Dry well and place into roasting pan.  Cover lightly with olive oil and sprinkle with salt (go easy, remember that the brine was salty) and lots of pepper.  Cook for 45 minutes to an hour or until a thermometer reads 170 in the thickest part of the thigh.  Remove from oven and allow to rest about 10 minutes before carving.  Enjoy!

Thanks, Sarah for a great challenge.  I hope that we inspire our readers to try something a little new.  Have you ever cooked with tea?  What did you make?  If you haven’t, let us know when you plan to try it.  Leave us some comments!  Oh, and make sure to check out our other Daring Kitchen adventures!


The Daring Baker: October Challenge – Povitica

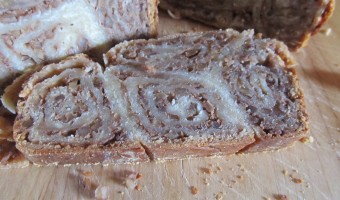
The Daring Baker’s October 2011 challenge was Povitica, hosted by Jenni of The Gingered Whisk. Povitica is a traditional Eastern European Dessert Bread that is as lovely to look at as it is to eat!

Jenni described Povitica to be like Kalachi. I was able to grasp an idea of what it what it was from that comparison. My mom learned to make Kalachi from someone in Eastern Ohio where she grew up. She has been making it for as long as I can remember around the holidays. This is one of her standard holiday gifts that she has on hand to give to neighbors if they show up with a surprise gift. If she lucky … or I should if family was lucky, she would get in an extra batch and include Kalachi as part of our gift to other families in our extended family.

Jenni’s recipe for Povitica used walnuts. I exchanged the walnuts for pecans in my version of Povitica. The main reason I did the exchange was that I have a mild walnut allergy. I love walnuts but I can only eat a bite or two before I regret it for several days. I knew I wanted to eat the Povitica so I went with pecans. The advantage to using pecans was that I was able to compare the Povitica to my mom’s Kalachi which uses pecans!

Here are the four final loaves …


These pictures didn’t show up exactly like I wanted so I am going to just show both of them since they do show the rolls and nice crumble when they were cut!


So I see why Povitica is compared to Kalachi but they are pretty different. The dough with a filling is a similar but the process is different as the Kalachi is a long roll (like a really rustic jelly roll.) My mom’s comment that this dough even ended up different. I do have to admit I after all of this, I really want some of mom’s holiday Kalachi because it is so yummy even it does go straight to your hips!

Special thanks to my mom for letting me take over her kitchen for make this! I left her two loaves as payment!! My October has been has been crazy and the only solid block of time I had to make this recipe was when I took the kids to visit my family last Saturday so … thanks mom!

The Daring Cooks’ Challenge: Moo Shu
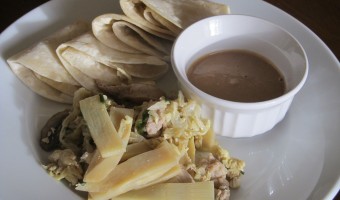
The October Daring Cooks’ Challenge was hosted by Shelley of C Mom Cook and her sister Ruth of The Crafts of Mommyhood. They challenged us to bring a taste of the East into our home kitchens by making our own Moo Shu, including thin pancakes, stir fry and sauce.

I’ve never had Moo Shu before in my life.  Invariably, my order at a Chinese restaurant includes steamed dumplings and one of four items:  fried rice, lo mein, sweet and sour anything, or General Tso’s chicken.  When I first started putting this together, my simple mind thought, “Oh, it’s kind of like making a breakfast burrito!”  In a lot of ways, the two are similar.  Scrambled eggs with meat and vegetables rolled into a flour shell and topped with some sort of sauce.  The description could cover both dishes.  After I tried the Moo Shu, however, I realized how much more sophisticated the flavors are.  The biggest issue I had with the entire dish was in making those darned pancakes.  I did not realize that rolling them out would take so long.  They were well worth the effort, but I surely would have started up much earlier had I known how time intensive they were.  On that note, here is a picture of the results (sorry, no process pictures…we were pressed for time this month!) and the recipes that we used to create them.  My notes on the recipes are in italics.

Thin Pancakes

These pancakes took seemingly forever to roll thin enough and cook.  My arms were hurting by the end of it!  Still, they were extraordinarily fresh and you could taste the difference that a little time and effort made.  Definitely give them a shot!

Makes 24-30 pancakes
Preparation time: about 10 minutes plus 30 minutes’ standing time
Cooking time: 45-50 minutes

Ingredients

4 cups (960 ml) (560 gm) (19¾ oz) all purpose flour
About 1½ cup (300ml) (10 fl oz) boiling water
1 teaspoon (5 ml) vegetable oil
Dry flour for dusting

Directions:

Sift the flour into a mixing bowl. Gently pour in the water, stirring as you pour, then stir in the oil. Knead the mixture into a soft but firm dough. If your dough is dry, add more water, one tablespoon at a time, to reach the right consistency. Cover with a damp towel and let stand for about 30 minutes.

Lightly dust the surface of a worktop with dry flour. Knead the dough for 6-8 minutes or until smooth, then divide into 3 equal portions. Roll out each portion into a long sausage and cut each sausage into 8-10 pieces. Keep the dough that you are not actively working with covered with a lightly damp dish cloth to keep it from drying out.

Roll each piece into a ball, then, using the palm of your hand, press each piece into a flat pancake. Dust the worktop with more dry flour. Flatten each pancake into a 6 to 8 inch (15 cm to 20 cm) circle with a rolling pin, rolling gently on both sides.

Place an un-greased frying pan over high heat. Once the pan is hot, lower the heat to low and place the pancakes, one at a time, in the pan. Remove when little light-brown spots appear on the underside. Cover with a damp cloth until ready to serve.

Moo Shu Pork

I used plain white, pre-sliced button mushrooms, the sliced bamboo shoots right out of the can, and a couple of pork chops that we had in the freezer.  I was going for easy that night.  I couldn’t believe how fast the eggs scrambled!  I think that might be my new method here in the mornings.

Serves 4
Preparation time: 25-30 minutes
Cooking time: 6-8 minutes

Ingredients

2/3 cup (1 oz) (30 gm) Dried black fungus (‘wood ears’)
½ lb (450 gm) pork loin or butt
¾ cup (3½ oz) (100 gm) bamboo shoots, thinly cut
3 cups (6 oz) (170 gm) Chinese cabbage (Napa cabbage), thinly cut
3 large eggs
1 teaspoon (5 ml) (6 gm) salt
4 tablespoons (60 ml) vegetable oil
2 scallions
1 tablespoon (15 ml) light soy sauce
2 teaspoons (10 ml) rice wine
A few drops sesame oil
12 thin pancakes to serve

Directions:

Soak the fungus in warm water for 10-15 minutes, rinse and drain. Discard any hard stalks, then thinly shred.

Thinly cut the pork, bamboo shoots, and Chinese cabbage into matchstick-sized shreds.

Lightly beat the eggs with a pinch of salt.

Heat about 1 tablespoon (15 ml) oil in a preheated wok and scramble the eggs until set, but not too hard. Remove and keep to one side.

Heat the remaining oil. Stir-fry the shredded pork for about 1 minute or until the color changes. Add the fungus, bamboo shoots, Chinese cabbage and scallions. Stir-fry for about 2-3 minutes, then add the remaining salt, soy sauce and wine. Blend well and continue stirring for another 2 minutes. Add the scrambled eggs, stirring to break them into small bits. Add the sesame oil and blend well.

To serve: place about 2 tablespoons (30 ml) of hot Moo Shu in the center of a warm pancake, rolling it into a parcel with the bottom end turned up to prevent the contents from falling out. Eat with your fingers.

Hoisin Sauce

(source: http://recipes.epicurean.com/recipe/13249/hoisin-sauce.html)

I put all of these ingredients into a Mason jar and just shook them until they all came together.  A great job for the kids!!

Ingredients

4 tablespoons (60 ml) soy sauce
2 tablespoons (30 ml) peanut butter OR black bean paste
1 tablespoon (15 ml) honey OR molasses
2 teaspoons (10 ml) white vinegar
1/8 teaspoon (⅔ ml) garlic powder
2 teaspoons (10 ml) sesame seed oil
20 drops (¼ teaspoon) Chinese style hot sauce (optional, depending on how hot you want your hoisin sauce)
1/8 teaspoon (⅔ ml) black pepper

Directions:

Simply mix all of the ingredients together by hand using a sturdy spoon. (At first it does not appear like it will mix, but keep at it just a bit longer and your sauce will come together.)

Thanks Shelley and Ruth for a great challenge!

The Daring Bakers: September Challenge – Croissants

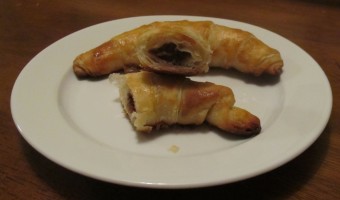
I am excited to post my first result of monthly challenge at The Daring Bakers! What was this month’s challenge?

The Daring Bakers go retro this month! Thanks to one of our very talented non-blogging members, Sarah, the Daring Bakers were challenged to make Croissants using a recipe from the Queen of French Cooking, none other than Julia Child!

Specifically, the challenge was to make a batch of croissants according to the croissant recipe from Mastering the Art of French Cooking, Volume Two by Julia Child and Simone Beck.

This was the Note at the beginning of the challenge …

Note: The most difficult part of making croissants is that they take a veeeeery long time. About 12 hours total, with resting and rising periods. However, at certain points you can leave it overnight. I have done the recipe twice – once over three days, and once in 12 hours. Both worked out well.

And that was the moment I freaked out. Croissants?! You see I gave up on croissants back in about 1997. That is the year I went to Spain with a group from my High School. Every morning for breakfast, we had croissants. I came home and told my mom that I would be happy to never see a croissant again! Seriously, I told her that. Now I had to make them. I did fall in love with croissants again one day when I went into a bakery and saw chocolate croissants. I mean it is chocolate, that has to make it yummy, right?! It did. I have a serious weak point for chocolate croissants now.

Well I can say I now made croissants. It took me two days to get these done because of the timing involved in it. I messed up the folding on one of the many folding steps because my dough was the wrong size at the end of that step. Brian is never going to let me live that one down but whatever.

Here is the full batch of a dozen croissants (half were plain and half were chocolate filled … the nicer shaped ones have chocolate) …

I have a theory that the chocolate ones rolled nicer because they had something to roll around to give them shape. The chocolate ones were definately my favorite but I can now say I have made both plain croissants and chocolate croissants from scratch! We let the kids have croissants for breakfast the morning after I made them. They were really annoyed there were no chocolate ones left the second morning after I made them. Those crazy kids are mine when it comes to chocolate!! :) I think Sophie would eat a chocolate croissant every morning for breakfast if I had one for her!

Just to prove the yummy factor of the chocolate ones here is a cut one close up!

Darn it, now I want a chocolate croissant. I can tell you that next time I think I am going to try one of the cheat puff pastry recipes to make these but you know what, I won’t feel guilty about that because I have made them the real from scratch way and have pictures to prove it! :)

Have you ever made croissants? Leave me a comment and let me know what you think about my croissants.

The Daring Cooks’ Challenge: Stock to Soup to Consomme

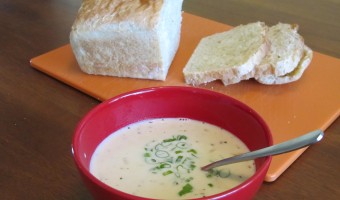
Recently, I signed up with The Daring Kitchen to be a “Daring Cook.”  Basically, each month our host cook challenges us to recreate one recipe.  We all create basically the same thing with a few variations allowed, but we all end up with wildly different results.

Peta, of the blog Peta Eats, was our lovely hostess for the Daring Cook’s September 2011 challenge, “Stock to Soup to Consommé”. We were taught the meaning between the three dishes, how to make a crystal clear Consommé if we so chose to do so, and encouraged to share our own delicious soup recipes!

This challenge was right up my alley for my first time here.  I love, love, love soup.  I make stocks and broths all the time.  I always save ham bones and chicken carcasses in the freezer (seriously, I paid for them!  Why waste?).  For this challenge, I chose to create a corn stock and then use that stock to create a corn chowder.  Just in case you are wondering, yes, I do keep and freeze corn cobs just for the purpose.  If you want to know more about that, check out our post on Freezing Corn.

Corn Stock

This beautiful amber liquid smells like summer.  Use it in soups or risottos to add that little extra bit of comfort when it gets cold outside.  Make sure not to add salt to the stock.  When it reduces, it will be very salty and high in sodium.  Just add it to your final dish using the stock.

Ingredients

1 large onion
3 stalks celery
2 carrots
4 cloves garlic
2 T peppercorns
12 corn cobs
water to cover

Directions

Chop onion, celery, and carrots into large chunks.  Put into a large stockpot with next three ingredients.  Cover with water.

Bring water to a boil.  Reduce heat and simmer 3 hours or until liquid is reduced by half.

Remove and discard the biggest chunks.  Pour liquid through a strainer lined with cheesecloth into another container.  Let cool before refrigerating.  Yield:  about 4 cups

Corn Chowder

This recipe is very fresh and very easy.  If you want to up the ante a little, some bacon, shrimp, or both would go well with this dish.  We served it with a side of freshly baked rosemary bread.  It soaked up the liquid beautifully.  I had the leftovers for lunch the next day in a freshly baked mini-boule.  Unfortunately, I got the better of myself and wolfed it down before I could get a picture.  The corn that I used for this recipe naturally came off of the corn cobs that I used to make the stock above.

Ingredients

2 T olive oil
1 small onion, diced
2 cloves garlic, minced
1/4 C flour
4 C corn stock
2 C heavy cream
1 1/2 C peeled, diced potato
2 C fresh or frozen corn
salt and pepper
sliced green onions (optional)

Directions

Heat oil in a soup pot over medium heat.  Add onion and garlic, cooking until soft, about 10 minutes.  Add flour and stir until well combined.  Cook about 3 minutes.  Add corn stock and bring to a boil.  Add cream and potatoes and boil for 8-10 minutes.  Reduce heat, add corn, and simmer for another 10 minutes.  Ladle into bowls, garnish with green onions, and serve hot with fresh bread!


These two recipes are very simple, healthy, and inexpensive.  They use just a little heavy cream, some fresh produce, and a little time.  I definitely enjoyed my first challenge with The Daring Kitchen.  I look forward to future challenges.  Let me know what you think.