


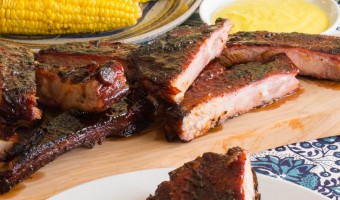
This shop is part of a social shopper marketing insight campaign with Weave Made Media® and Farmland/Smithfield, but all my opinions are my own. #weavemade #ReadySetRibs http://my-disclosur.es/RgFrEH I love ribs! Seriously, who doesn't enjoy a good rack of ribs? Beth's … [Read more...]
10 Products to Make You Fire Up Your Grill

Does summer mean grilling season for you? It does for us. Brian has already been grilling salads. I think this grilling season is going to get interesting! Check out these great grilling products that will keep you grilling all summer long!14-Piece Deluxe Stainless-Steel Grill … [Read more...]
Pop Chef creates Healthy Kid Snacking

We are excited to feature a sponsored Pop Chef review. Details ... Pop Chef is the new, fast and easy way to make fabulous edible creations! The secret is its 3-in-one action – which shapes, pops, and creates stars, circles, hearts, and more without the mess or hassle of … [Read more...]
Pumpkin Doesn’t Grow in a Can: Fresh Pumpkin Processing
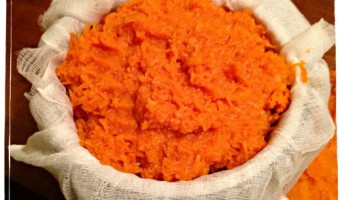
Since a reader asked here is a quick version of Fresh Pumpkin Processing! In case you don't know, pumpkin doesn't grow in can and it feels so wrong to admit to that. I grew up eating Libby's Pumpkin. It was the ONLY pumpkin mom ever bought. It was the best and for pumpkin pie, … [Read more...]
Plate to Pixel: Digital Food Photography & Styling
Details ... Tips and techniques for making food look good—before it tastes good! Food photography is on the rise, with the millions of food bloggers around the word as well as foodies who document their meals or small business owners who are interested in cutting … [Read more...]
Powerless Breakfast on the Grill
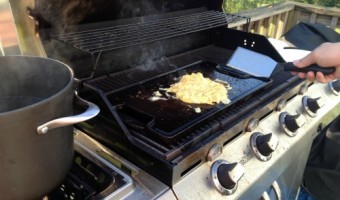
So what do you do when you wake up and the power is still out from when it went out at 9pm? You strategically plan on how both you and your spouse can get items out of the fridge at the exact same time. You talk through where everything is and who gets what and then you open the … [Read more...]
Friday Favorite: Oneida Trigger Cookie Scoop
Details ... The Oneida Trigger Cookie Scoop is an essential tool for anyone who loves to bake. This classic, trigger-style scoop features a brushed stainless steel handle. It's also dishwasher safe for easy clean-up. Oneida Trigger Cookie Scoop: Trigger-style … [Read more...]
Friday Favorite: Carnation Lemon Bread Kit

Friday Favorites is another almost weekly feature here at Simply Budgeted. The whole point of this feature is to share some of our favorite finds. Anything is game. Food. Cleaning supplies. Kid stuff. Garden favorites. Recipes. Anything that I really like and want to randomly … [Read more...]
Gold Teflon Skillet

We were sent a 10” skillet with Gold Teflon® nonstick coating. It is a special edition that was created in celebration of DuPont’s 50th Anniversary! This is perfect for the holidays as well, because nothing says celebration more than cooking with a little sparkle! I had the … [Read more...]
Friday Favorite: Sil-pin Bakers Rolling Pin
Friday Favorites is another almost weekly feature here at Simply Budgeted. The whole point of this feature is to share some of our favorite finds. Anything is game. Food. Cleaning supplies. Kid stuff. Garden favorites. Recipes. Anything that I really like and want to randomly … [Read more...]
Sweet Pressed Cookie Stamps-Stampin’ Up!

Details ... The Sweet Pressed Cookie Stamps allow you to create beautiful, hand-stamped cookies in a flash. Just make your favorite shortbread cookie dough (or one of the two included recipes) and stamp away! The stamp images are completely food-safe and child-friendly. Pair the … [Read more...]
Meatless Monday: Middle East Feast
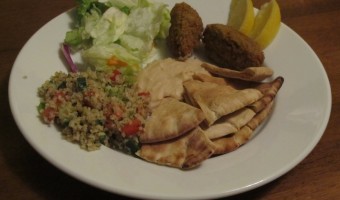
Today's Meatless Monday was a clean out the cupboard meal. We had some Middle East mixes in the cupboard so they became tonight's feast. We had the Manischewitz Falafel and Hummus mixes and a Near East Taboule. My father visited the Middle East several times when I was growing … [Read more...]
Birthday Cake and More Birthday Cake

I am late getting this up. Really late actually as it has been about one and half months since Grace's 5th birthday party for her friends. Grace turned five back in August. She had four cakes and one batch of cupcakes. Lucky girl!!! The cupcakes went to school for her birthday … [Read more...]
CWC Food and Wine Pairing Wheel App

Details ... Do you ever second-guess yourself about which wine will work best with your meal? We’re here to help! This fun and convenient food and wine pairing tool can help you pick wines to enjoy with everything from steak to fried Twinkies®. Yum! Use this app as your … [Read more...]
Two Cents Tuesday: Freezing Corn
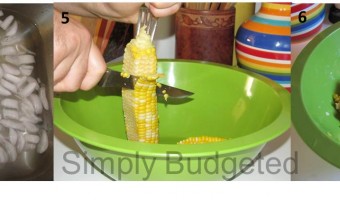
It's corn season! MMMMMM! I love fresh corn. Unfortunately, it all comes out at the same time. Who wouldn't like to have that fresh corn taste all year long? Well, it's really not that hard. We have been freezing that fresh summer corn for years. It takes a little bit of … [Read more...]